Hi! Could someone help me figure out what I’ve done wrong with the Teensy? I ordered the Micro v4.5 AIO board from JLCPCB and I’ve soldered the Teensy, but after looking at some photos of other boards, it seems like I wasn’t supposed to solder the ethernet connector to the Teensy? Could someone explain how I’m supposed to connect the ethernet port on the board to the Teensy? I’m assuming that the ethernet kit I ordered was not the right way to go since there’s nowhere to put the port. Thank you!

You don’t need the ribbon cable/ethernet connector dongle, although you should be able to connect and autosteer with what you have in your picture by plugging into the dongle.
Basically the 2x3 pins on the Teensy need to be connected straight down to the AIO board. There’s a variety of pin/header combos that can achieve that.
Oh I think I get what you’re saying. I just saw the PCB layout and there’s a 2x3 set of headers where the ribbon cable is connected. If I want to use the ethernet on the PCB, would I need to solder a pin like this onto the Teensy and plug it into the female pin on the board?
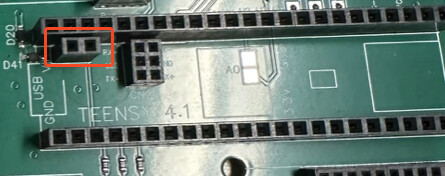
And one more question, do I need to do something with the other two pins circled in the photo below? What are those for?
You can do a variety of things to make the connection work.
Unfortunately when PJRC designed the Teensy, they chose a 2mm pitch header for that connection where everything else is 0.1". The different pitch headers have different standard heights. It means you can’t use standard headers for the connection.
You can solder what you linked to the bottom of the teensy, then stick 2x3 mm male header pins between it and and the board.
Or you can buy special extended length male header pins and solder that to the bottom of the Teensy. I don’t have a part number handy for you.
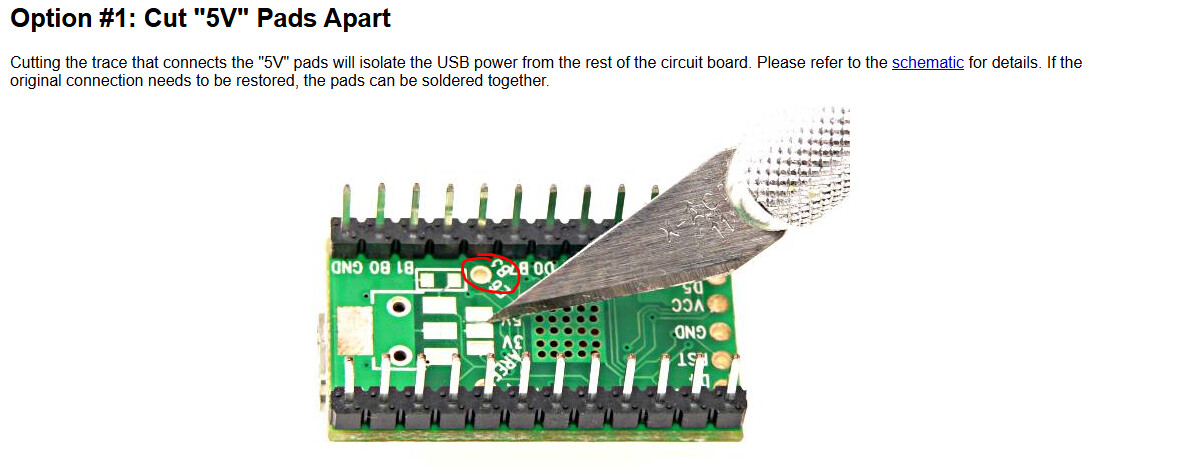
Those other 2 pins are to separate USB power from 5v board power. Even though its a 1x2 header, only one of the holes does something (JLC doesn’t stock a 1x1 header).
You can leave everything as is and not worry about it. You really shouldn’t plug in both 12v power and the Teensy USB at the same time if you leave it as is.
Or you can cut this trace and solder a header pin in, then you can safely connect 12v power while plugging in the Teensy USB.
1 Like
Thank you so much!
1 Like
I bought my 2x3, 2mm pitch tall pins direct from PRJC. I just looked at their website and they said Spark Fun is doing their manufacturing for them now. The link below is for the correct Ethernet tall header pins.
1 Like
For a v4.5 with the female socket on the PCB side the correct length pins are Samtec MTMM-103-09-G-D-280 and can be obtained from the usual places (Digikey, Mouser, etc)
I wish you could get the Teensy with them already soldered in. Oh well.
2 Likes
I’m not sure if these are the same pins you referenced, but I ordered my teensy from this place and had ethernet pins already installed. It plugged right into my PCB and works fine.
Those looks correct, that would be easier for most people. I’ll certenly order those if we need more Teeny’s going forward. The Samtec part is correct though for anyone who needs to order them.
You are an absolute god-send! After having ordered 20 normal size 2x3 pins not the smaller size ones to replace the two sets of pins that are too short that Sparkfun supplied. Having a solid part number to go with helped so much!

Reichelt elektronik in Europe
BKL 10120704
BKL 10120739
MPE 156-3-006