F9P firmware update and config files

Updating ZED-F9P Firmware

Download the Windows tool u-center (careful, not u-center 2 which is not yet compatible with ZED-F9P): u-center

Go to u-Blox ZED-F9P website

Scroll-down and click on the “Documentation & resources” tab

Scroll-down one more time until you see the “Firmware Update” section and then download the latest Firmware (as of 05th June 2020, the firmware version is this one : UBX_F9_100_HPG_113_ZED_F9P, aka 1.13 or you may stay on the previous version UBX_F9_100_HPG_112_ZED_F9P, aka 1.12)

First, connect your GNSS device to a computer using a USB micro cable.

Now start the U - blox “u-center” software. Then on the top left corner of the screen, left-click on the reversed tiny black triangle to select the COM Port related to your GNSS device. (it may differ from COM7 as shown in pictures)

Make sure the connection icon is blinking in the bottom state bar. It indicates that the serial communication between the computer and the GNSS device is working.

Then click on ‘Tools’ → ‘Firmware Update…’

The Firmware Update Utility window opens :

Click on the ‘ Firmware Image ’ ‘…’ browse button

Go to the right location on your computer to choose the update binary file corresponding to your ZED-F9P device

Then click on ‘ Open

Make sure the option ‘Use this baudrate for update’ is ticked and baudrate is set to 9600 bauds

You can now start updating your ZED-F9P board by clicking on the ‘ GO ’ green icon

Once the updating process is done, a message saying “Firmware Update Utility completed successfully” should be displayed in the console box.

Update is now complete !

However you might want to verify the new updated version number. To do so, follow the next steps:

In u-center, while your RTK device is still connected, click on ‘View’ → ‘Message View

image

The UBX messages window opens :

On the tree structure on the left, click on ‘UBX’

Then click on ‘MON (Monitor)’

Finally on ‘VER (Version)’

On the right side panel, check the ZED-F9P firmware version number

You have successfully updated your RTK device and checked the version number.

This process will reset the board, therefore you will have to load the configuration files again.

9 Likes

Loading a configuration file:

Download the Windows tool u-center (careful, not u-center 2 which is not yet compatible with ZED-F9P): u-center

Download configuration files from AgOpenGPS forum.

configuration files

Rover is configuration file for tractor.

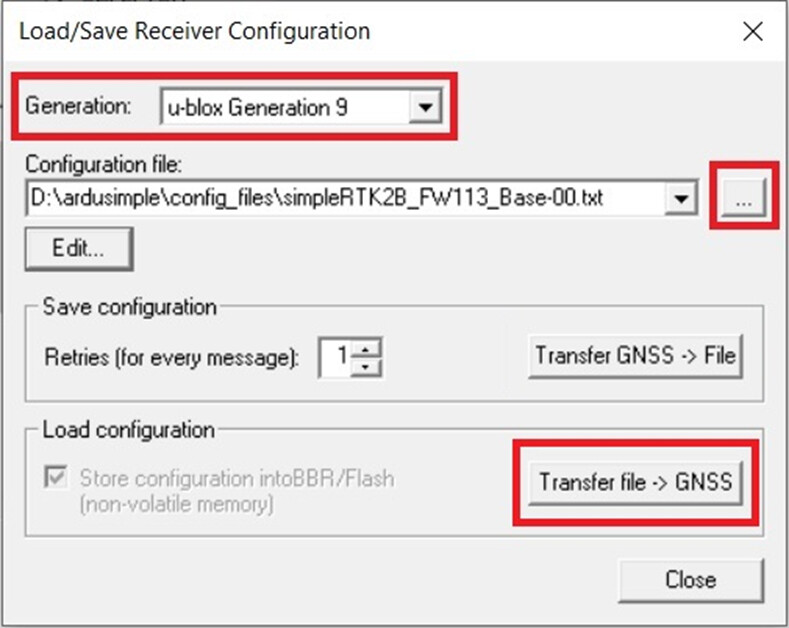
• Go to Menu Bar > Tools > “Receiver Configuration” (“GNSS Configuration…” in older u-center versions)
• Select Generation “u-blox Generation 9”
• Select the configuration file from your hard disk
• Click “Transfer file → GNSS”

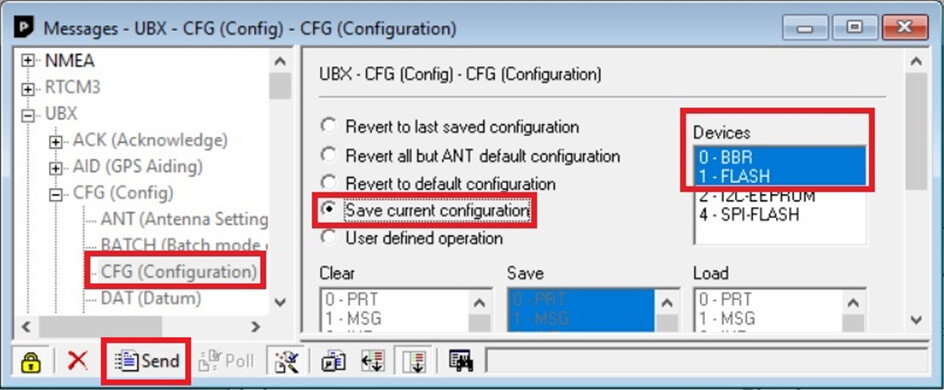
When finished, the simpleRTK2B will start using the new configuration immediately. But if you remove the power, it will revert back to the previous one. To store permanently our new configuration, we need to:

• Go to Menu Bar > View > Message View
• Find the message UBX-CFG-CFG
• Select “Save Current Configuration”
• Click “Send”

NOTE for simpleRTK2Blite users: when loading configuration files to simpleRTK2Blite board, you are using UART1 (via USB with a UART-to-USB converter). The configuration files might change the baudrate you have on your board, leading to a loss of communication in the middle of the configuration file update. When this happens, just change the baudrate of u-center and load again the configuration file at the new baudrate.

9 Likes