Hello everybody.
I have an application where I needed agopengps to do a task for me.
I will describe.
On an AB line, every 1.5 meters (or another predefined distance in the program) needed a signal to activate a relay (for 5 seconds for example), using one of the wires available on the ampseal plug.
Example:
At the beginning of the line, activate autosteer for the tractor to align.
Then, when it is in the alignment I need, I activate the spacing function and a signal is sent, after 1.5 meters, another signal and so on, until the end of the line when I deactivate the autosteer.
Repeat the cycle on the next line.
Is it possible to do that?
My PCB is all-in-one v2.4, two antennas with motor on the steering wheel
I hope the explanation of what I intend makes sense.
Thank you for your help?
Sounds like the tree planter version might be what you’re looking for. Tree Planning
Yes, I’ve seen this version but I didn’t find an option to send the signal over the wire to the relay. It only makes a sound when it reaches the tree
It sends out a tree byte in the machine pgn.
Let’s see if I understand.
I use ampseal pin 7 to activate the relay.
And I have to activate the “hydraulic lift config” function in the settings.
With each tree that passes, the relay is activated for the seconds that I configure
Right?
It would be a custom ino that reads the particular byte and sets the time from that.
Hi kentStuff I was going too fast and with my eyes closed.
I’ve been reading your tutorials and posts and they’ve been a great help. I didn’t have the machine module built and I hadn’t realized it was necessary. I managed to build one with an Arduino Uno and a block of two relays.
Now I have the section control working.
When the tree reaches the location, a tone is played.
How do I configure it so that the relay activates at that location, so that the mechanism drops the tree at that point?
I believe that there is a setting in the side screen of the tree firm that will turn section 1 on and off at the tree. I think there was a setting for radius that will trigger the tool.
Otherwise you need to read the tree byte from the pgn.
You can then add to arduino code to trigger for a given amount of time as needed.
It has been a few days since I have been in that code. I started converting into the 6.xx version but it will take some time.
I also think there is an option to turn the section control on and off.
I can activate and deactivate the tone and the top button has the auto section.
The auto section works in the headlands and where the tool has already passed, the solenoid activates and deactivates at these points.
I’ve been playing with the settings, but I can’t get it to click on the tree.
What do you mean by “read the tree byte from the pgn.”?
Sorry, but my programming skills were pushed to the limit when assembling and programming the PCB.
I appreciate your help.
I took a refresher course on the tree planner. And have a few helps to offer.
In the AGIO settings button there is AgDiag. This has been deleted in the most recent version of AOG. You will want to run the AGIO that comes with the tree version. If it doesn’t have this in the settings menu you will need to open one that does.

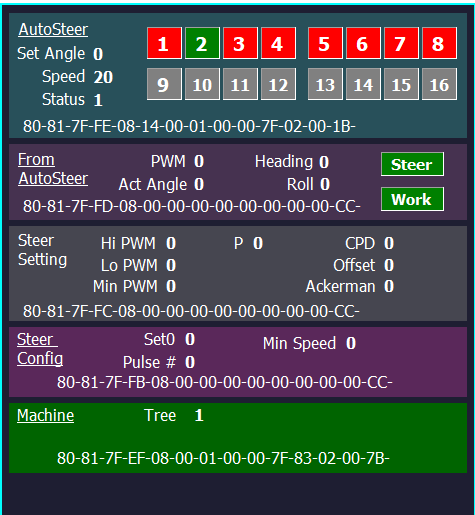
When you open the AgDiag you will get a window that looks like this. You will note on this screen at the top, #2 is green and at the bottom of the screen there is a machine field with tree on it. The green #2 at the top and the tree 1 at the bottom means we are over a tree within the range we have set. The green #2 at the top means that the #2 section has been turned on. The Tree 1 at the bottom is the tree byte has been sent to the tree pgn. At the Machine byte (green bottom) in this picture are the numbers 80-81-7F-EF-08-00-01… This last 01 is the tree byte. It is the seventh number in the sequence or in the programing it is byte [6] because the numbering starts with zero. Also note near the end of this string there is a 02 that is section 2 is active.
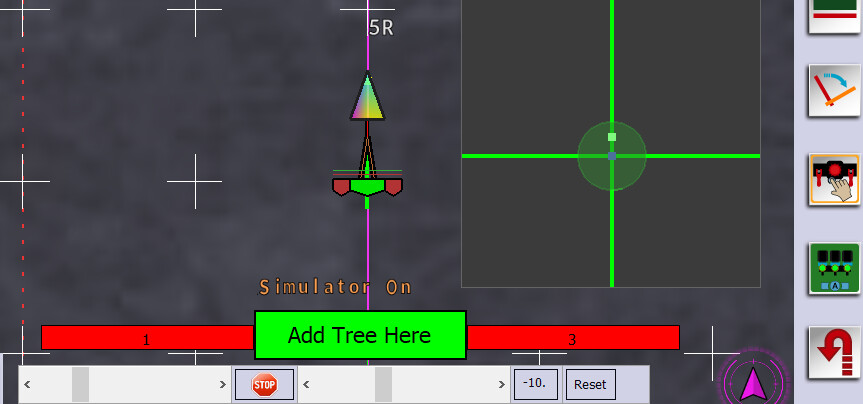
In the image below, note the autosection is turned on and I have clicked the section 1 and 3 on the screen to turn them yellow and then red to off. Now only section #2 is effected by the location of the tree. The big plant tree here button is the center section. Don’t click this unless you want to plant a tree here!
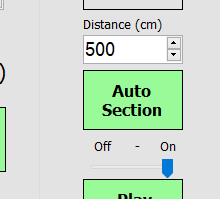
Below is the settings inside the tree panel.
What you are looking at is distance…(this is the manual spacing of the ABLine) It overrides the tool width. This can be set to the tree spacing left and right on the screen and the ABline with drive each tree space regardless of the tool width. Very helpful if running a smaller tool.
Auto Section… This is green. That means it is on. This will control the status of the #2 section of the tool. The off on below this button controls if the #2 section turns off or on at the tree. For example… If you were planting trees, you would want to trigger the tool over the plant. But maybe if you were spraying between the trees, you might want to turn the section off at the tree. As shown in this picture it would keep the section off between the tress and on at the tree.
This being said, the Tree byte is independent of the section control. The tree byte will send at each tree regardless. This will be part of the machine board ino. It will need to be a custom edit of the ino to do something if byte[6] is greater than zero. In the newer ino’s, V5, the gpsSpeed is set to this value. Easy to modify, but for your use, you would likely rather use the section #2 status.
Thank you for your help.
It works ![]()
I was about to give up but I changed the pins on the Arduino and it started working. On Arduino Uno only works on pin 12, perhaps by changing the code in the Arduino IDE, it will work on another pin, but that is too complex for me.
It’s working, now I can plant my vines.
Thank you for everything ![]()
This is great. We would love to see a video of it working
I am prototyping the machine for planting vines, to incorporate this new function.
When it’s “finished” (it’s never really finished) I’ll make a video ![]() .
.
One more question, is it possible to align the tree grid with the AB line ![]() .
.
I know how to align the AB line with the grid, but the grid with the AB line I don’t know if it’s possible, does it make sense?
Absolutely, download the link below and drop the .txt and it should play a short video of how to do this. I set the ab snap to the tree spacing and then open the abdraw screen, turn the trees on and click on the trees you want to drive. I also do one at 45 degrees. This will only align to the reference line of trees because you would need to set the absnap to 1.414 times the tree spacing (distance across the diagonal.
I understand the prototype issue, you are more than welcome to PM me if you would rather keep it off the whole forum.
2024-05-24 10-20-51.mkv.txt (2.0 MB)
Edit:
Just reread your post. This video does what you know. I will redo.
Like this…
2024-05-24 10-40-04.mkv.txt (2.1 MB)
You can also start an ABline from the current point and set the angle or drive to another. Then set the gird.
2024-05-24 10-55-50.mkv.txt (2.7 MB)