It seems that it will not be easy. I have measured the voltages of the wires and:
White: 0V (ground)
Yellow: 4.96V
Gray: 2.57V.
If yellow and gray join: lift.
White + Gray: low.
I guess gray is the common one.
With this, what could I do? Give up integrating it into the pcb and use a module with double relay?
Is there some kind of isolated switch built into the pcb that allows loads?
Thanks!
From what I read, an optocoupler might work okay in this situation. Even though by nature they are NPN and normally do low-side switching (connecting the high collector to the low 0v emitter), it can work to do high side switching. So maybe give it a try. On the lower side, white would be the emitter and gray would be the collector, and on the raise side, gray would be the emitter and yellow would be the collector. It just might work. There’s unlikely to be any real load involved (very high impedance).
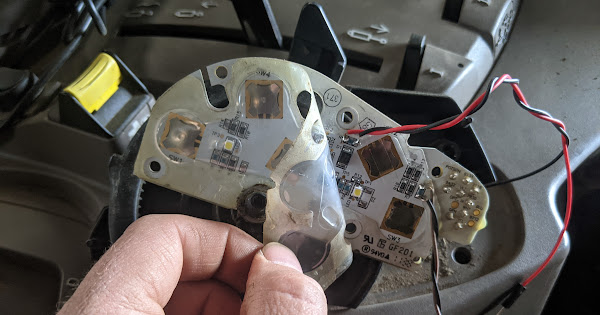
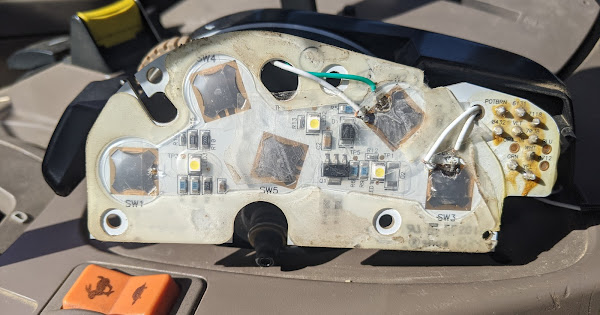
Ok so I overcame the fear of cutting into something that I knew was going to be mega expensive if it went wrong!
All works, when I cross the wires the tractor thinks that HMS switch has been activated
The soldering is very fiddly and hard to make a tidy job… But it works!
Just need to connect the relays and machine module but thought I would share my pictures of my progress so far.
Thanks @torriem for giving me the confidence to get the job done!
7 Likes
So I am now looking how to implement my work connecting into the HMS buttons
I built up the machine module today and used lift and lower on the bench to see how it works with AOG and relays…
I want it to work with a power harrow combination seed drill, so need it to raise up on the headland, and lower several meters before the headland, so that the planting matches up, as there is a delay in seed getting into the ground
From my testing headland lift and lower it is all at a set point in AOG… whatever you set the headland, what method are people using to do what i am wanting, looks like u turn settings can be used, but don’t understand them fully
Joe,
thanks to motivated me again!
i do same job as you but my PCB looks different than you and i see some blue cms resistor component connected to the button so it will be more easy to make a dot welding
so the result is like this

My box is ready and my autosteer, ino soft also! ( Rear linkage / steer module - #12 by bricbric)
So smal test by playing with gear ! and result as i expected
in AOG make a field , bondary, headland, make a line , activate Hydro and autosection !*
in Tractor activate HMS and set the task request …
waiting now a real field task !
1 Like
That is great, looks much nicer work than mine!
Do you connect your relays for lift and lower to D2 and D5 on autosteer board?
Does your ino work with CMPS14? As i have just changed over to this.
Just looked into this a little more…
AOG v5 has a hydraulic look ahead setting which I believe allows for lowering of the machine prior to the headland line.
I will make a machine module and use V5 from now on. This will be easier for me than trying to find space in my already cramped autosteer box.
Joe,
Yes it works with D2 D5 ( autosteeer board) ( i like thsi function because no need to add other Nano for only this )
i modify litle bit:
to stop the relay at the setup to avoid activation
and use the INO of CMPS14 for 4.3.10
find it the zip file ( need to rename in .zip) Autosteer_USB_cmps14_raise_lower.txt (22,9 Ko)
As image the relay box that i use for the motor and the raise and lower version  (small error on the picture about the green wire)
I did a test with two 4n33 powered with 5v on a proto pcb and connected them as you suggested. It worked perfectly. Thanks for your help.
1 Like

So I went ahead and did this on our John deere 6210r, it seems that the method you used @bricbric of spottong solder on the resistor works very well.
For anyone else wishing to do this,
R8
R5
Are the resistors to find… test with a multimeter on continuity setting when pressing buttons to be sure.
1 Like
Hi again, I´ve questions about the resistor configuration of my 4N33 system. What do you think of this:

In my test with proto pcb I only mounted resistors on the 5 outputs and the 5V inputs. Would the rest be necessary?
I don’t know a lot about it, but I don’t think you need resistors on both sides of the LED side of the 4N33. But I don’t think it hurts anything.
As for the other side of the 4N33 I’m not sure what’s required.
you can do something like this if you expect burst disturbances. Very sure you won’t need it here, so the 1k is enough as long as you don’t need to limit the elevator current for any reason I don’t know.
The voltages are low and the original switch just dead shorted the wires together, so we can assume the current flow was already quite low. I don’t think anything is needed on the switch side of the 4N33, but I don’t see any problem with a 330 ohm resistor on each output (although not sure which side of the transistor woulds be best).
Joe
this afternoon the real test with this HMS function with 4.3.1 version and the autosteer hydraulic lift version (Rear linkage / steer module - #12 by bricbric)
i enjoy because it is really fun and you can repeat task
but i have some concern about
First i dont know what happen but some time the function to lower is activate without reason?
(HMS is blinking not sure autosteer board or relay but probably some noise or bad contact)
Second the HMS switch dont like so much to be puch several time and cancel the procedure so sometime the function looks never work
Third when you want to catch the line manually and you activate autosteer near headland border AOG transfer immediatly an order to raise and quickly after autosteer board tranfer an other message to lower so result the linkage never down
So i think ino code need to be modified to avoid this trouble,
After activate the steer switch never raise the linkage only down can be accepted
or in headland cannot activate the raise and inside the headland never lower
the raise and lower need to be activated one time only in their activity field
this request will be adapted only as a kind of Button mode compare to valve request
(a manual switch on the screen will be also a bonus to test and use)
a video about this initial test
Waiting now V5 for test again
1 Like
Bricbric well done on the video!
I haven’t had the chance to test the hms for real in the field. Hopefully i will get the chance to test when we start planting maize soon.
I have only tested the 6930 (the first attempt I made soldering to the switches) as the 6210r (soldered to resistors) I assume will just work the same.
When testing I changed lift and lower time to 1 second as I believe this is the shortest amount of time the switch can be triggered, in the original ino.
Hello Saturday i can try AgOpenGPS V5 with Hydraulic lift in Autosteer board,
First thanks @BrianTee_Admin to add the PGN for autosteer board,
Thanks To @giotoma to adapt hydraulic lift in auto steer board with this code
"update broken link for ino modified "
Raise_and_lower_by_autosteer_D2_D5.ino
Thanks To @Vili to modify the icon to be more and more better
Even i was disapointed last time about uncontrol situation when we adapt some manual mode , Saturday test was done perfectly without trouble
No video because really similar to last one except V5 software
Lets check now the seed growing to see the result
Farmer helping Farmer!
1 Like
Hi!!!
I have loaded the Autosteer_USB_v5_0_MACHINE (2) file onto my autosteer PCB arduino but it doesn’t send a signal through D2 and D5. (I have defined a headland and the hydraullic lift icon appears green, the green and red arrows appear on the screen. AgOpenGPS-5.2.0 version). I miss something?
hello
Did you activate raise and lower in arduino setting and update the arduino code fom AOG?
?
This?:

I press to green and send+save.
First i loaded the Autosteer_USB_v5_0 and then with the one you posted here on April 26. With none it worked. What code do I need?
Thanks!


