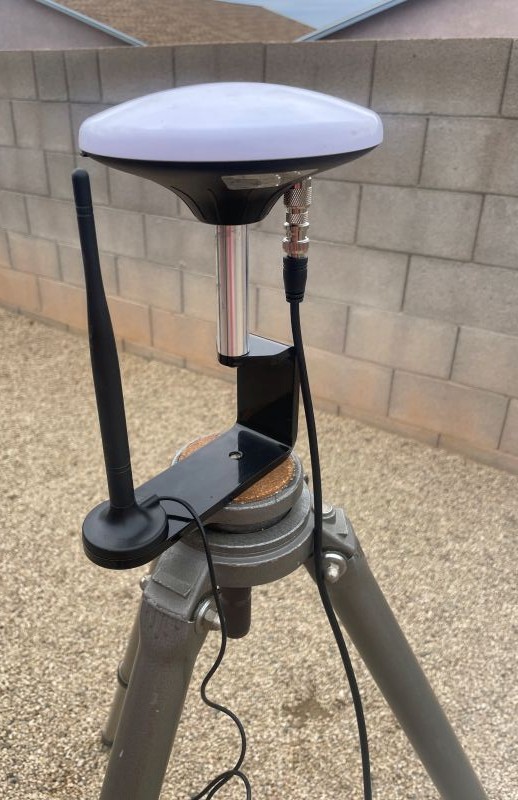
Version 2 of the base station is done. Andy
2 Likes
I missed why you went to a radio single base station vs a NTRIP correction ? correct me if Im wrong but taking down and setting up the base station will effect the repeatability ?
1 Like
Plan is to keep it up for the entire duration of leveling a field. However during my research I read that a local base station is more accurate than one that could be 20 miles away.
Andy
2 Likes
It’s more the lower VDOP you get that helps with levelling - having a base that’s close vertically as well as horizontally can make a big difference, so I’m told.
2 Likes
Theoretically RTK is plus minus 12cm PLUS 1mm per KM so 12 kms doubles your variance.
3 Likes
Also due to the data delay from the server to AOG, it will be milliseconds but it is a delay when operating the blades
3 Likes
Did you mean 12mm rather than 12cm? Andy
2 Likes
Yeah, 5 to 20mm + 1ppm, depending the receiver.
In nice stable weather a base a few km away is fine but in difficult conditions it’s better to have it close.
Some meters in vertical position between antennas should not affect the accuracy IMO.
If you feed rtcm correction to the mobile base at startup it will fix in a few mm range each time. I plug a laptop with Ucenter to my F9P at startup.
3 Likes
Note - I have zero experience with scrapers so this may all be nonsense.
Originally I thought that the software will only control the blade height when cutting and the rest of the time would be manual control, but I am now wondering why the blade height of the entire cut-haul-dump-drive cycle cannot be fully software controlled.
Front scraper has an apron, rear scraper does not.
- Drive to cutting site
- Move lever to raise apron and press button to start cutting with front scraper
- Software controls blade height and calculates how much LCY are in front scraper
- When front scraper is full software automatically raises front blade to Xcm above ground height
- Move lever to close front apron
- Software automatically lowers rear scraper blade to start cutting
- When rear scraper is full software automatically raises rear blade to ground height (no apron)
- Drive to dump site (blade heights are maintained over terrain)
- Operate lever to open apron and start dumping from front scraper
- Software automatically controls front scraper blade height to grade dirt as it comes out (USDA NRCS has max layer height per pass for compaction)
- Software automatically controls rear scraper blade height to match front scraper so that it doesn’t get in the way
- Move lever to close apron and stop dumping from front scraper
- Software automatically raises blade to Xcm above ground.
- Move lever to start dumping from rear scraper
- Software automatically controls rear blade height to grade dirt as it is dumped
- Move lever to stop dumping from rear scraper
- Software automatically raises rear balde to Xcm above ground
Hmmm… maybe I could take this a step further and put another IMU on the front scraper apron, then when the lever is operated to raise the apron but not start dumping, the software knows that cutting has started? That would reduce the entire user operation to just moving the remote levers.
Thoughts?
Andy
1 Like
Couple of comments
I will be interested to see how accurate the software is when calculating how full the pan is. I find some passes “super loads” the pan and other pass I struggle to fill it fully in a greater distance. Horsepower/traction/soil conditions/speed all play factors. All that to say travelling with a pan 80% full is not efficient. Actual testing will find the efficiencies and operator preference on controls. Currently though I do see it at least for loading as a “end dig” button which would then switch to rear pan cutting. Again followed by a “end dig” which would put the pans into travel height. This way the operator can insure a full pan before going to the next step.
Dumping: Travel speed and hydraulic flow both come into play to layout a nice mat. Nothing is worse than creating a whoop to bounce over on the next pass. Timing the end dump on the lead pan and starting the dump on trailing pan to get a even mat in my mind would be very difficult. I do on my pass back over the last pass for dumping (on my way back to the dig site) keep my plunger all the way forward and drop the edge to smooth the surface out. That way I do a grading pass back over it to fix inconsistency in dumping. Full pan-half full- almost empty at the end of the plunger stroke all change the amount of soil coming out the front. I do find whoops are created at the beginning and end of the plunger stroke and between loads. So it would be good to do a touch up pass. For operator comfort/speed as well as making sure final grade is achieved. Doing a grading pass also does a small amount of firming up of the soil. So hopefully the software doesn’t mind setting the blade height to regrade the dumpsite
3 Likes
My current approach is to divide the field up into 2ft x 2ft “bins”. From the survey I know the height of each bin. As the blade passes over a bin it removes a specific amount determined by the blade height and this is then converted to volume, multiplied by the swell factor and put into the pan.
Immediately I can see issues - the blade may only pass over a part of the bin for example. So my code only adds soil to the pan if the blade passed over at least 30% of the bin.
This means there is room for tweaking and fudging to match reality. ![]()
But maybe the entire approach is too naïve?
some passes “super loads” the pan and other pass I struggle to fill it fully in a greater distance Horsepower/traction/soil conditions/speed all play factors
This is a worry to me because I cannot input any of those variables into my software to adjust. If there was a way I could put a sensor on the pan to detect how full it was…?
For my first field I will only have manual control of starting and stopping dumping.
So am I right in understanding that after each dump you deliberately drive back over the dump with the pan tilted and the blade at a height of 0mm to compact and grade it?
Thanks, Andy
1 Like
Just trying to understand this better.
Suppose a “bin” has a surveyed height of 100mm
→ Hs = 100mm
I want to dump a max of 30mm at a time so I set the blade height to 30mm and start dumping.
Now the expected bin height is 130mm
→ He = 130mm
but the result is uneven, so maybe it is anywhere from 120mm to 140mm
I end dumping, drive back around and set the blade height to Hs + 30mm
I drive over the bin and it grades it to Hs + 30mm
Is that right?
Andy
1 Like
So am I right in understanding that after each dump you deliberately drive back over the dump with the pan tilted and the blade at a height of 0mm to compact and grade it?`
Yes. This way it pulls material from a high spot to a low spot. A lot of technique is required to get a good finial grade(maybe not as much with assisted guidance). This grading pass I find very important. It doesn’t add any time as you just loop back over the dump site. I find if I dont keep the dump site levelled I do become tired of looking at a uneven bumpy mess. By the end of your job Im sure you will be proficient. The beginning not as much ! A friend came over to help me with a project and he had operated a scraper for many years building roads. He taught me many techniques to running a scraper. He could make my little 6.5yrd scraper sing !
`→ Hs = 100mm
I want to dump a max of 30mm at a time so I set the blade height to 30mm and start dumping.
Now the expected bin height is 130mm
→ He = 130mm
but the result is uneven, so maybe it is anywhere from 120mm to 140mm
I end dumping, drive back around and set the blade height to Hs + 30mm
I drive over the bin and it grades it to Hs + 30mm
That sounds good in theory. As long as the program doesn’t add anther 30mm. I have wondered how the final grade is set. Is it based off the mapping program? and is it off an elevation ? If that is the case then it should take much less time than having to eyeball and come up with a strategy to bat dirt around to get it flat
3 Likes
With scrapers and final grade a lot depends on the dirt your working with. Nice mellow topsoil lays out nice. If you are in sticky clay a computer program may struggle to lay it out. Hence multiple passes before that area is to grade.
Thanks! That is very helpful.
When the survey is performed the GPS elevation is measured. Then the final surface is just an addition or subtraction from that height.
So for point X the measured height might be 30m and then the final elevation for that point might be -10mm.
Andy
OK thanks. I have sandy loam. ![]() Andy
Andy
1 Like
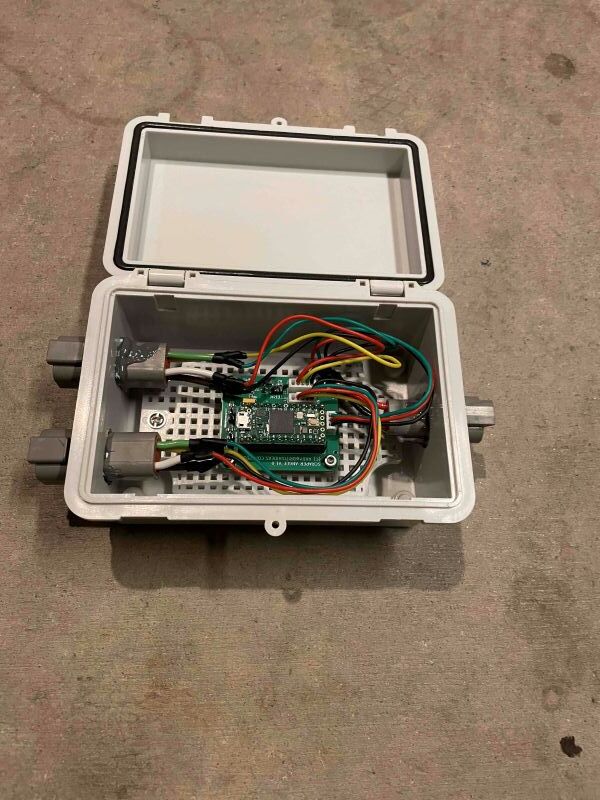
Angle sensor is completed. Two Deutsch four pin connectors for CAN bus and power and three pin Deutsch connector for the sensor. Andy


2 Likes
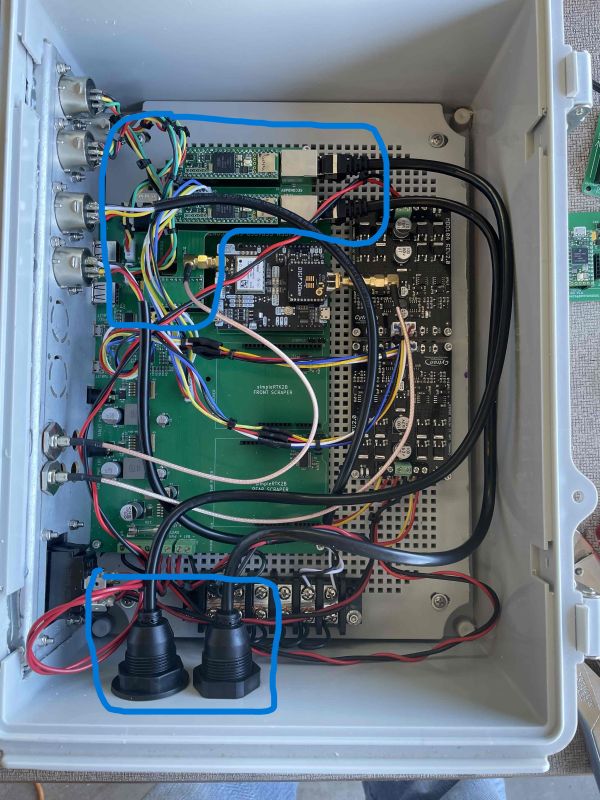

I’m not happy with my box full of crazy wiring and UDP hack. I am concerned it won’t be reliable with the rough and tumble of a tractor.
I have come up with a new concept. This has some simplifications and a smaller physical size, along with removing most of the wires.
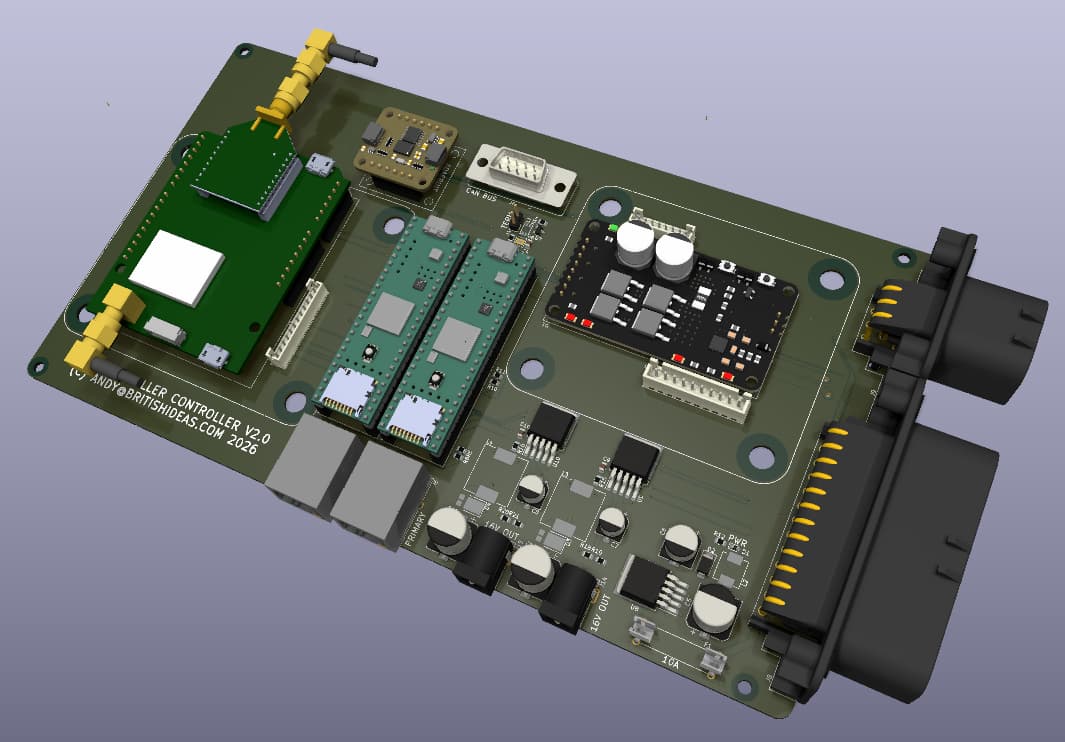
This board has:
- Integrated IMU for the tractor
- Support for one or two tablets using Ethernet/UDP with on-board PSUs
- Tablets can communicate with each other via an on-board serial link
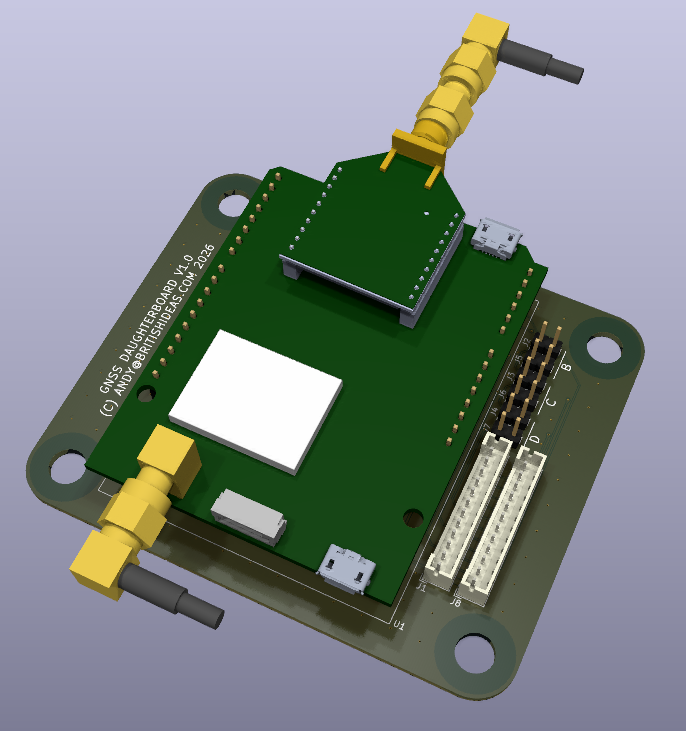
- Up to four GNSS rovers
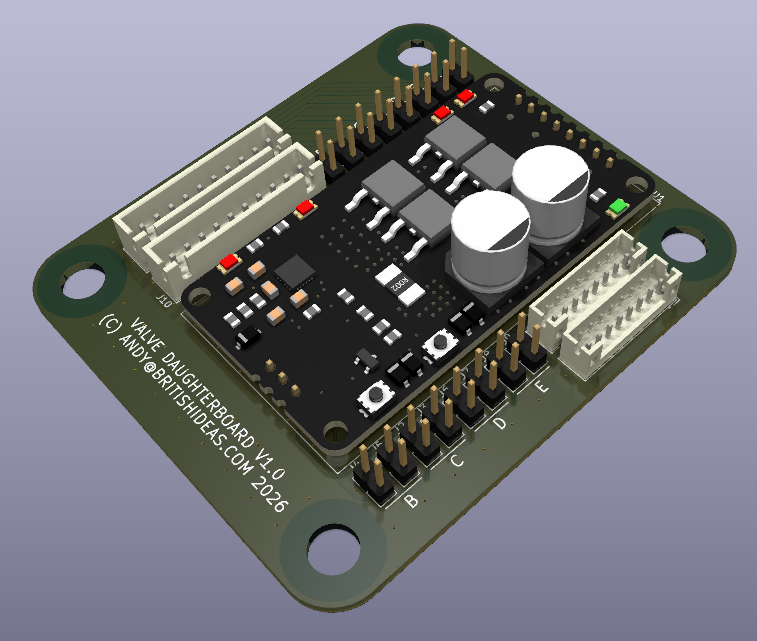
- Up to five valves/motors
- A possible future custom board added to the “GNSS stack” with four GPIO to the Teensy
- Four GPIO to the outside world with two supporting analog inputs
- Three CAN bus connections for simplified wiring
Here is the mother board:
Here is the GNSS daughter board:
Here is the valve/motor daughter board:
Here is a “full setup” of four rovers and five valves/motors.
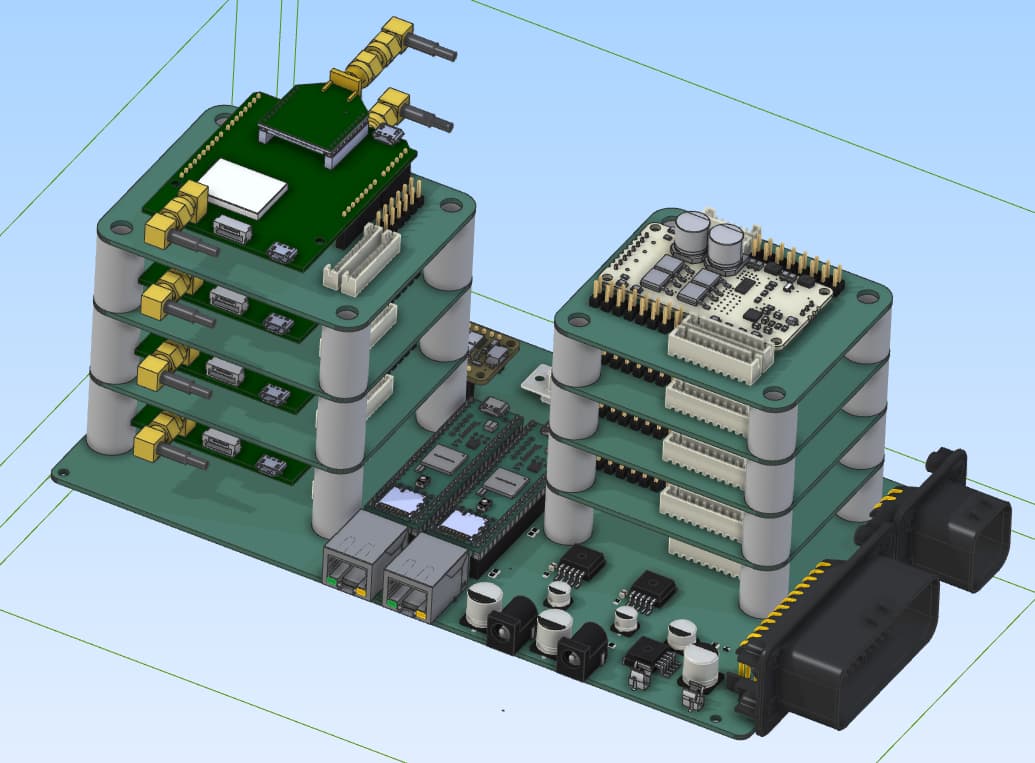
The full setup fits into 20 cubic inches.
Andy
3 Likes
Are you still considering the BNO085 as IMU?
It seems that the TM171 would be a great improvement ![]()
Especially in dynamic situations.
I would consider to add his footprint.
1 Like