Hungarian Facebook group: AgOpenGPS és egyéb mezőgazdasági automatizálási lehetőségek, projektek | Facebook
Videos are in Hungarian (magyar as we say), sorry.
So we’re done with 3 tractors  2 McCormick and 1 MTZ 892.2
For 2 person it takes about 1+1 day to get the installation done. (1 day for the hardware and 1 day for the electrical stuff)
I started to do some getting started videos, how to calibrate it:
How to add a new field and AB line:
Installation pictures:
McCormick TTX 190 → https://photos.app.goo.gl/kvPNASPcNpkSoPz86
MTZ 892.2 → https://photos.app.goo.gl/fEmwbmeLEXi9jGdi8
McCormick CX95 → https://photos.app.goo.gl/86S1zcEwruydogzCA
McCormick X6.440 → https://photos.app.goo.gl/yK1qVxGWH7ijNSmA6
These all use the TPS as WAS sensor idea of mine: Throttle Position Sensor as WAS - #8 by BGunics
With the motor holder of @bricbric All the 3D models of entropiemaximun・Cults
And the gearset of @PotatoFarmer AOG Universal stl - Google Drive
With a combination of either electical junction box as the home for the AIO or the 3D printed case designed by @Vili All in One PCB - #5 by Vili
Tablet is a Dell 5290 that can do 600 nits of brightness which is perfect for AgOpenGPS in terms of screen and overkill in terms of the i5 8th gen CPU and 8G RAM. But at 200EUR each it’s a perfect match for us.
15 Likes
2 more complete (props to my brother / father for the mechanical part)
2 Likes
2 more CNH tractor is done: New Holland T7.165 and Case IH Puma 160
Pictures here: https://photos.app.goo.gl/Rrc2DPm1gCWg8A647
and we also have a John Deere from 1995 and a similar aged Massey Fergusson
3 Likes
Csináltam egy youtube csatornát: https://www.youtube.com/@AgOpenGPSMagyarorszag
Ha küldtök tartalmat szívesen kiteszem.
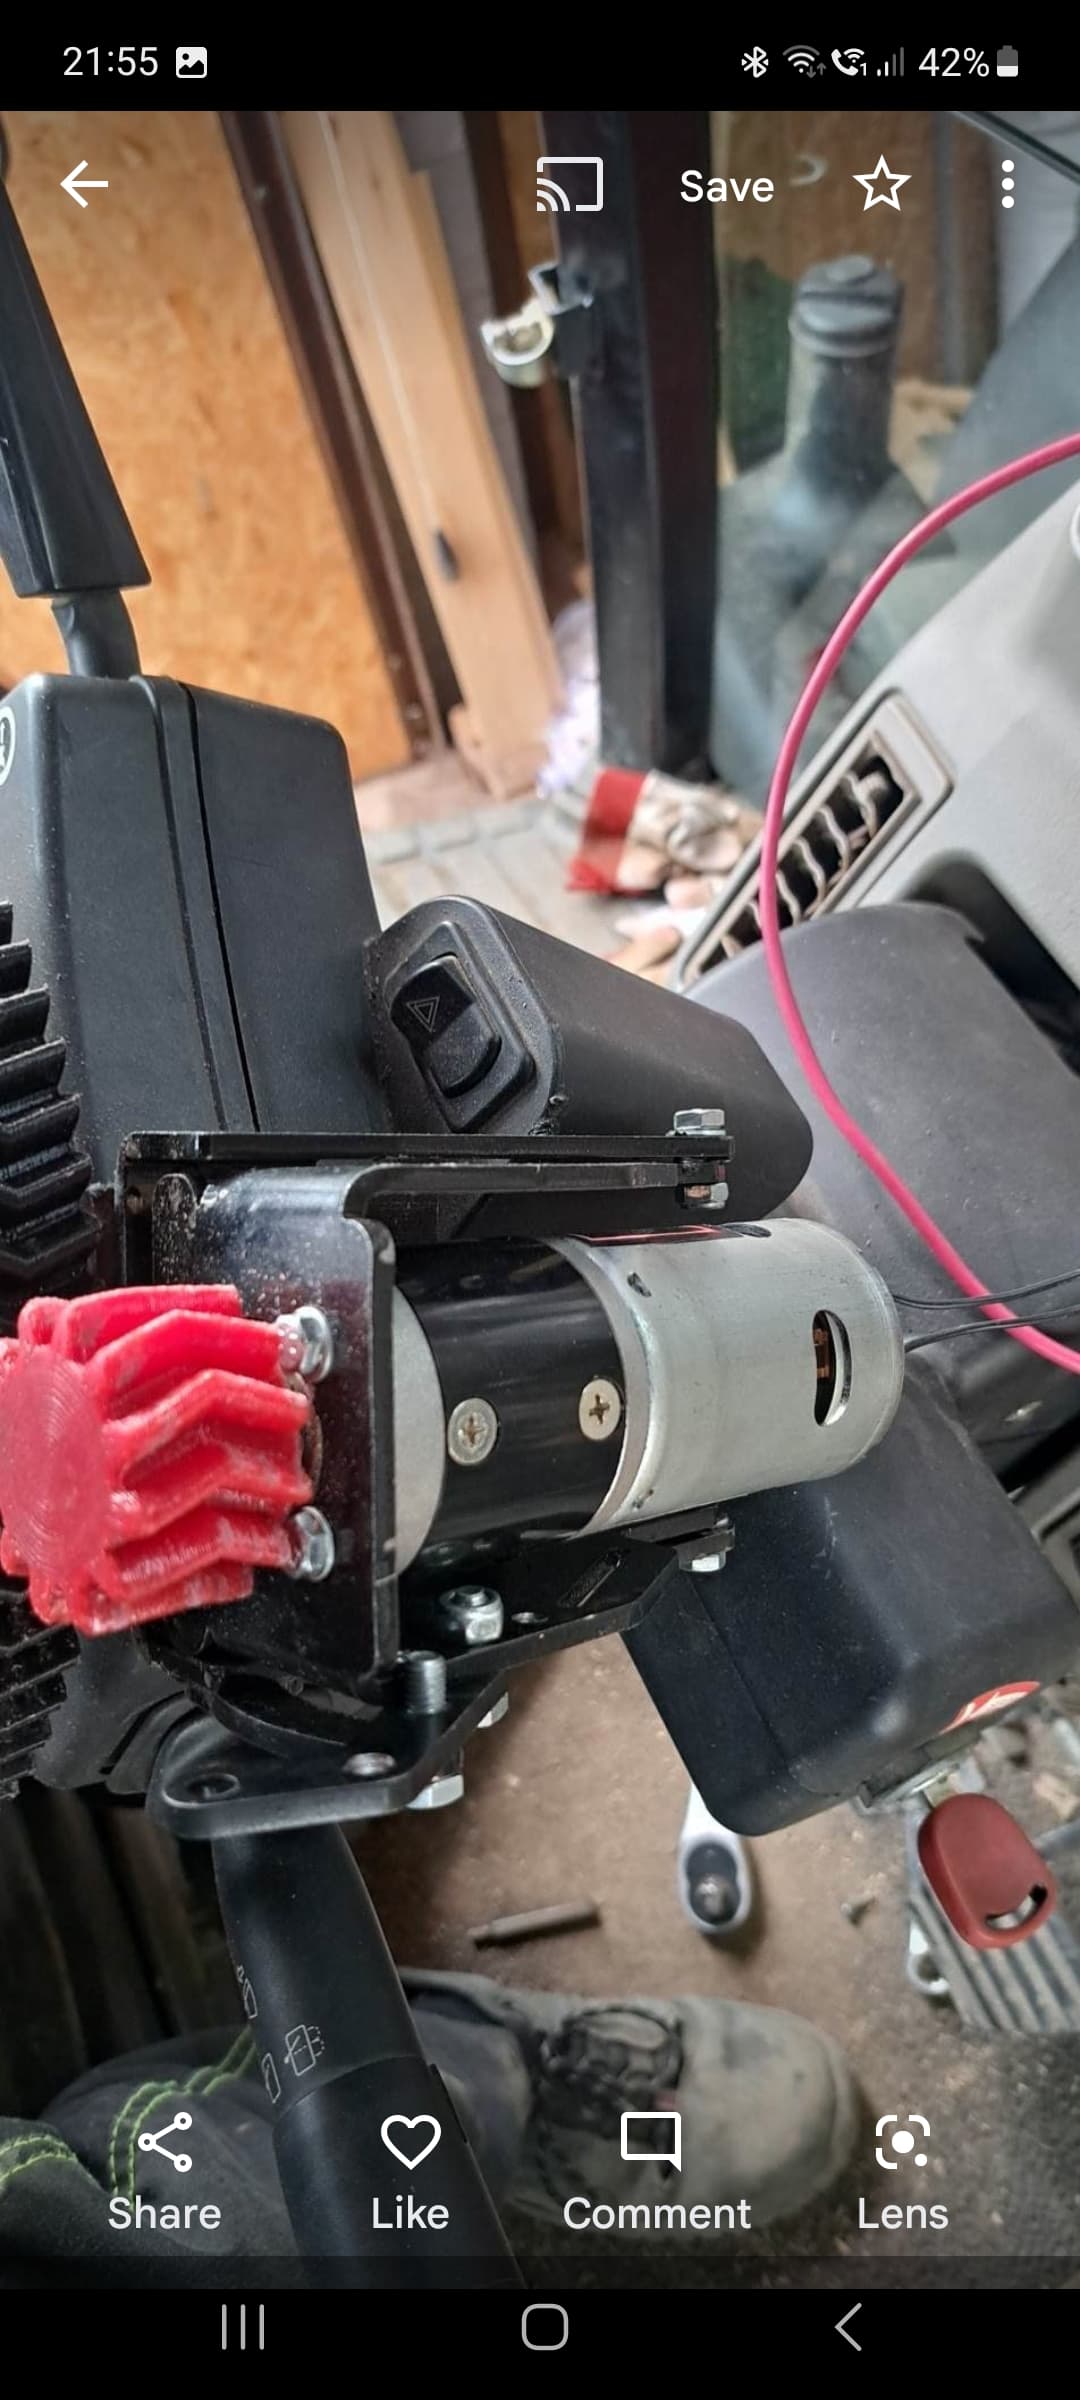
I dont suppose you have some close up pictures of how you mounted the motor bracket to the case and new holland. Have a new holland tsa with the same dash and struggling to find a decent mounting point.
Looking again i see your motor folds away from the gears, i like this idea, how have you done it?
Added some extra picture to google photos!
1 Like
Thanks alot. Cant quite tell but have you cut the plastic trim to find a fixing point behind?
I like the mount point top side of the wheel next to the hazzard switch
How have you fitted a bracket to this area under the steering wheel? I must investigate further on mine, can see the steering wheel shaft but that rotates. Did you pull the plastic trim apart?
Have you and designs links to this motor holder?
Remove the steering wheel and you’ll see clearer
Yupp I see the exact same logical thinking on your side as it was on ours…
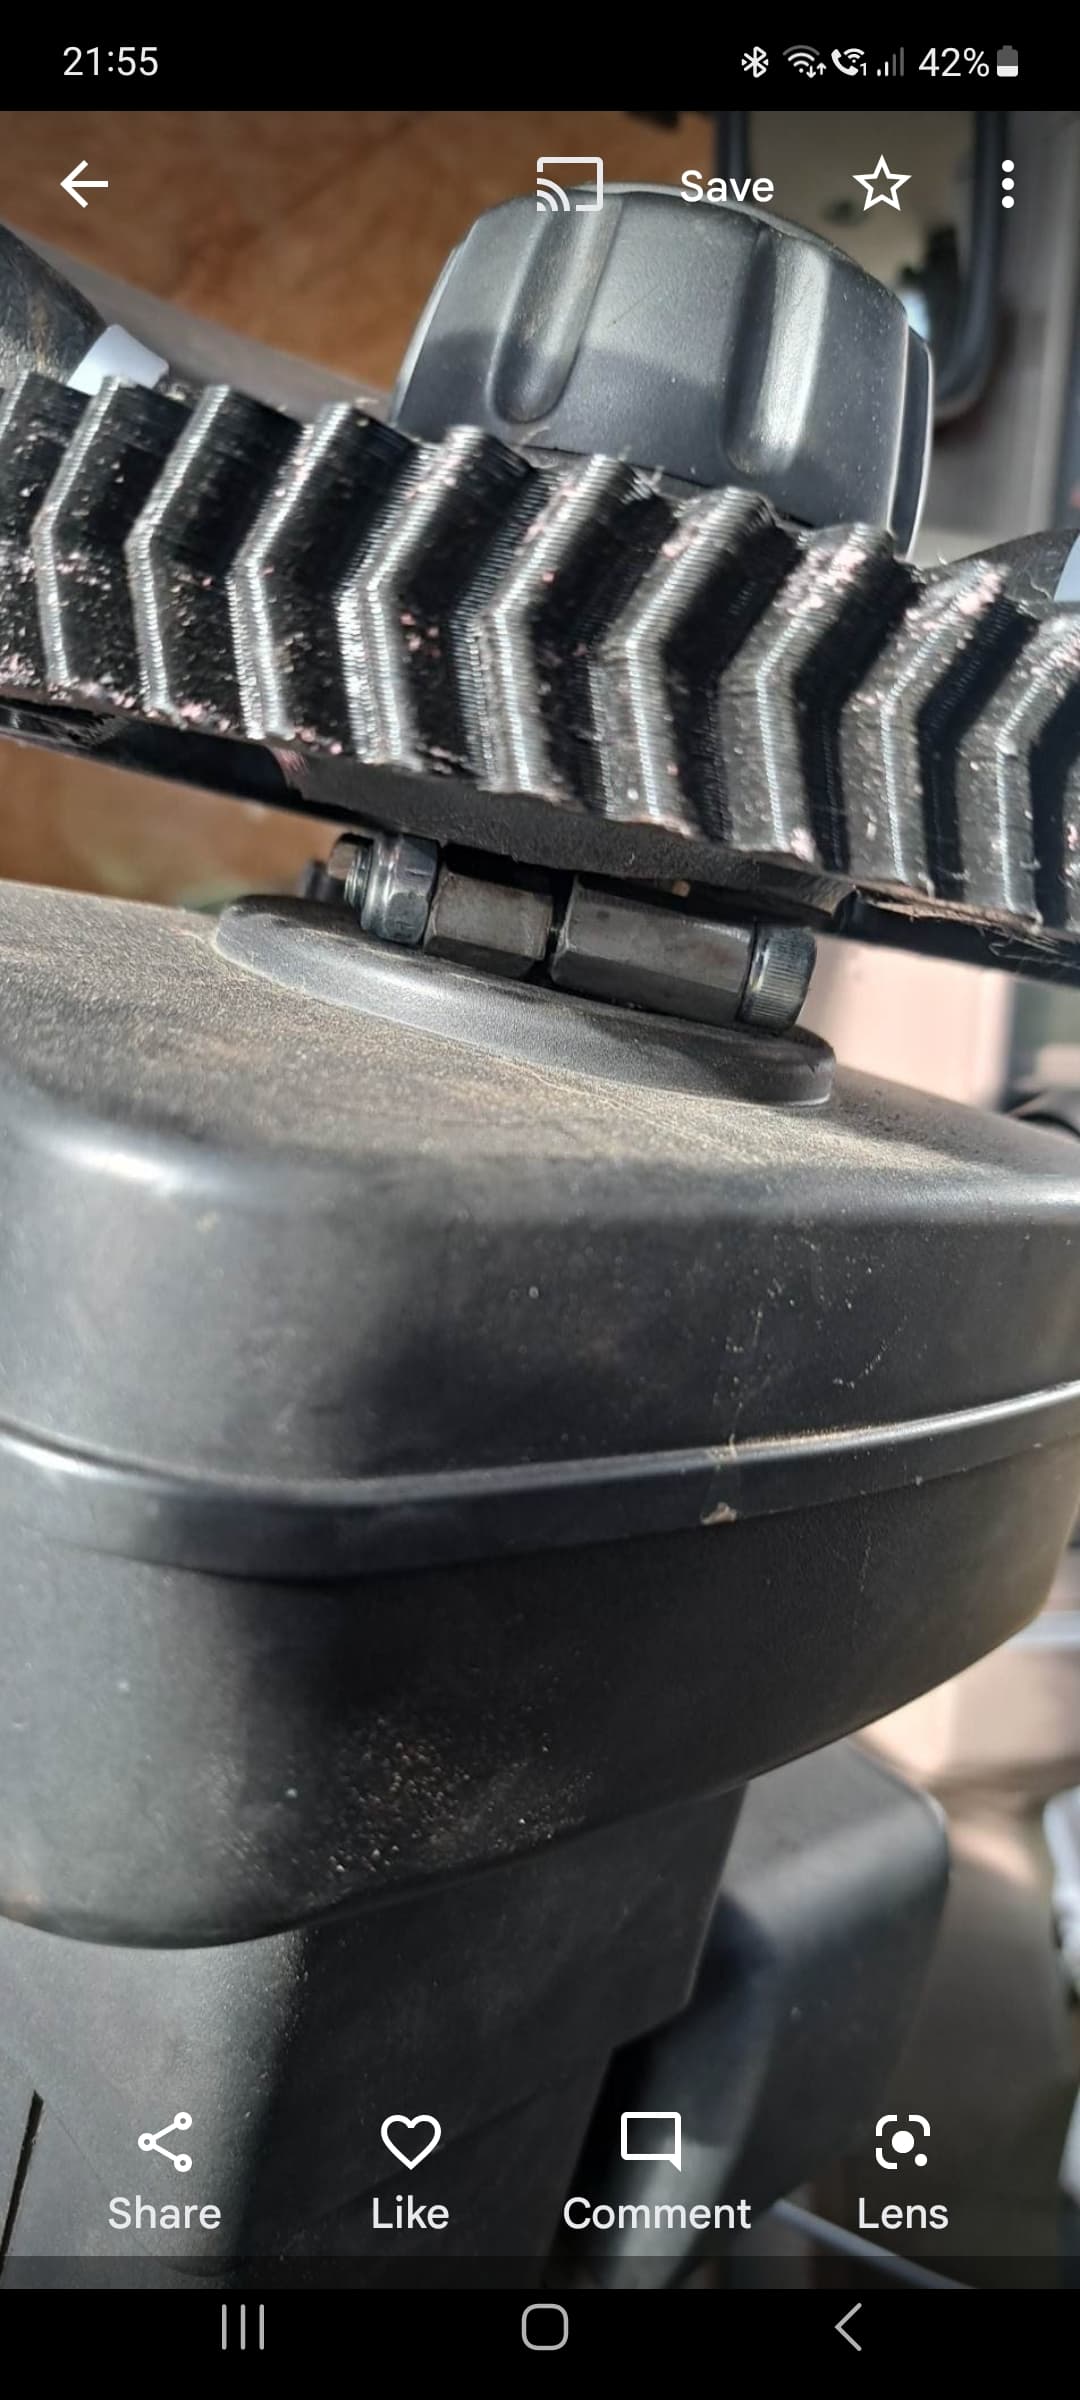
What we did realize is that the parts are not 100% mesh together (at least not with our not super fine tuned printer so had to file the teeths…) it might not be circular… And at the end 80% of the cases we had to pull the steering wheel anyways. So having the gear in 1 piece overall saved time and frustration.
Ive had a closer look in the new holland but i havnt pulled the steering wheel off yet
I can see a round metal boss down inside below the plastic trim. Did you put that hose clamp directly onto the boss or did you put something on the boss 1st to get yourself a bit higher to the top of the plastic trim?
What size hose clamp did you use?
It was done by a farmer so I don’t know the hose clamp size.
From his pictures he clearly used this and had the mount plate come out between the 2 plastic piece.
The one picture is showing the mount plate is cut in through the plastic and the motor is at the front/bottom. In the other picture the motor is the top side (where id like to put mine) and looks like its mounted underneath the steering wheel to that boss in my picture, doesn’t look like the plastic trim is cut but it might be
same kind of tractor but different owner different thinking
What tablet Holder you have for 5290?
Cutting board from pepco. Costs like 2.5 EUR a piece and made of bamboo  . Works pretty well.
Winter (dec-jan) progress from my side:
Newholland T7 with factory valves (Trimble out AOG in)
JD 6110M Autotrac with fema valve
JD 8320R AT ready with Danfoss valve
Fendt 936 profi plus (need to revisit with F9P by spring)
Valtra S374
Not too bad as a hobbbyist 
2 Likes
Hi,
Do you have a wiring schema for the John Deere’s?
Thanks in advance.
to which one?
FEMA is → cut wires (left / right has 2-2 lock has a GND so I just cut the one that locks) add a connector inbetween, so you can pull it apart and add your own connector. LEFT / RIGHT / LOCK + 2xGND
Danfoss I explaned under the 8320 topic: JD 8230 hydraulic steering - #27 by BGunics
2 Likes