One of the most important settings is the basic Autosteer settings. In this document we will try to guide you to get everything working correctly.
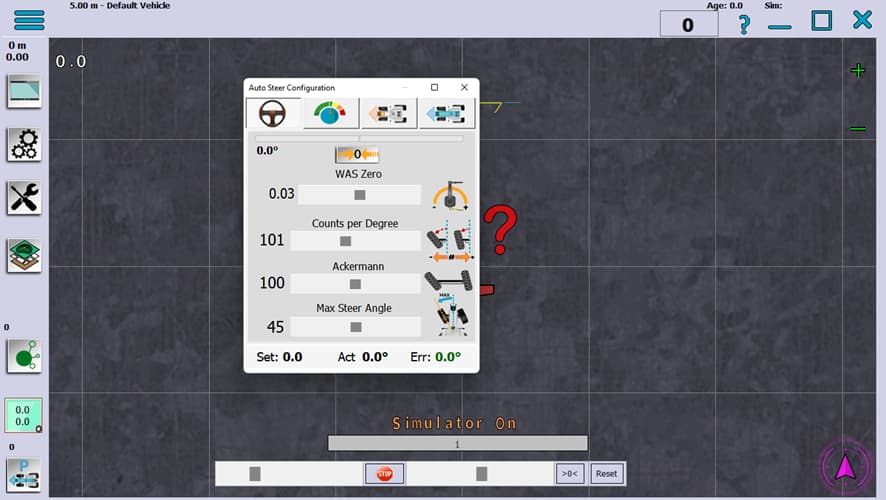
STEP 1: Open Auto Steer Configuration window, click in degrees icon information and a new window will pop up.
If you press on the lower part of the window, it expands, showing new functions for the configuration, there are a total of three expansions, that pressing on that part again appear or disappear, in a cycle.
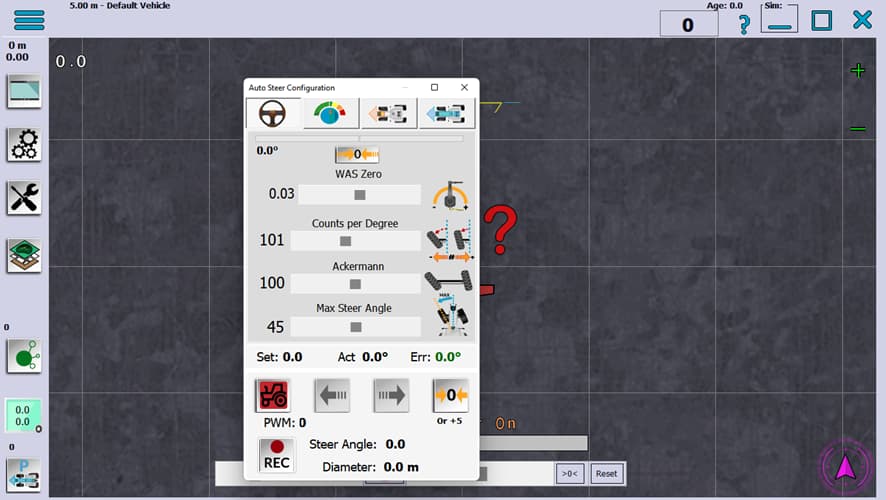

Last expansion allows you change some settings about your steer system, remember press Send+Save after tweak this part.
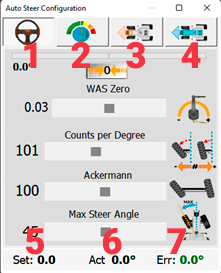
Step 2: Tabs in main window
- Steer Configuration
- Power Configuration
- Stanley Configuration
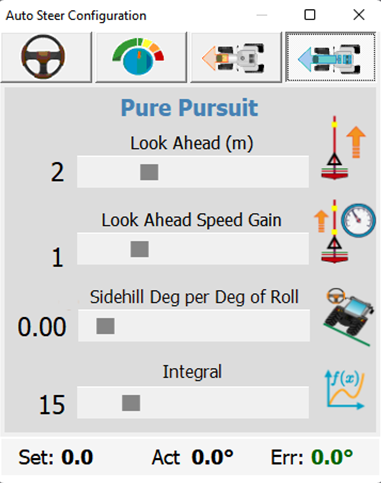
- Pure Pursuit Configuration
- Set angle by AutoSteer
- Actual angle read on WAS
- Error angle between Set and Actual
Step 3: Steer configuration
WAS Zero : Allows the steering angle to be zero degrees when driving forward. This setting must be done and be zero degrees when driving straight ahead in order to be properly set. Wheel Angle Sensor (WAS) zero allows you to remove that non-zero steering angle so it is zero degrees. This is a very important setting and must be accurately set.
WAS Zero Slider: For manual calibration, or tweak calibration
Counts per Degree: The A/D converter puts out -4000 to +4000 (8000 in total) levels as the Wheel Angle Sensor puts out 0 to 5v. To convert that into steer angle degrees - because we don’t visualize counts very well, we now divide those levels by counts per degree. So, when the CPD is increased, the wheels turn farther for each degree needed. When lowered, the wheels don’t turn as far.
Ackermann: Ackermann steering geometry is a geometric arrangement of linkages in the steering of a vehicle designed to solve the problem of wheels on the inside and outside of a turn needing to trace out circles of different radius.
Max Steer Angle: Maximum angle your tractor can turn.
Step 4: Set values:
-
Drive in a straight line and press WAS Zero.
-
Extend the main window, and press the Drive button, to check that driving in a straight line is correct, if it deviates, repeat step one.
-
You can fine tune manually with WAS Zero Slider.
-
Turn your wheels to the maximum to check the angle of rotation to the right and left. To adjust that both sides have the same value use the Ackermann slider.
-
Checking real maximum angle. You can use two ways to check this, one using a phone app to read that angle, or run the REC function on extended window. REC function needs drive in a circle to knows your real angle. Press REC and follow instructions.
-
When you have the actual maximum angle adjust to match the reading using the Counts per Degree Slider. Best results are set slightly below the real angle.
-
Set Max Steer Angle slightly below of your real angle, if you set same of higher, the motor never stops when you are using U-Turn.
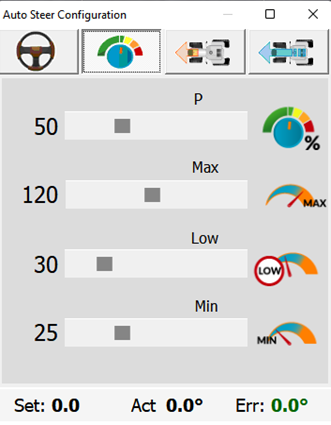
Step 5: Power Configuration
-
P: The proportional gain are multiplied by the error then added to the minimum PWM value to generate the final output value. The higher this value the faster the motor will correct the steering. However, if it is too high, the steering will overshoot the line and then oversteer the other way again. Too low of a value and it will either take too long or never get to the guidance line.
-
MAX: The maximum PWM value to generate the final output value.
-
LOW: As the vehicle gets closer to the line, the gain is reduced linearly from the max value to the low value. This helps it overshoot the line when close, but provide rapid movement when further away.
-
MIN: Minimum PWM value is used to apply a minimum amount of power to overcome friction of the valve/motor.
Step 6: Set values
-
Use extended windows, turn on the drive function, stand still, press the left and right arrows to see if the steering is moving, adjust the MIN value to make it happen.
-
Set LOW, this value has to be higher than MIN, if it is too high it will be sneaking, if it is too low it will take time to take the line.
-
MAX and P values need to be adjusted to your needs, play with the values until you find the one that works best for you.
Step 7: Stanley and Pure Pursuit
For some time, in previous versions, Stanley mode worked better than Pure Pursuit (aka PP). This does not happen in version 5, so we will focus on the PP configuration.
-
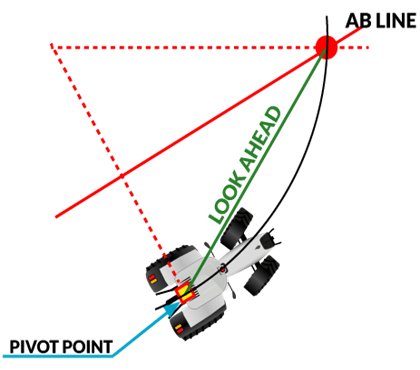
Look Ahead: Distance in meters how far is reference point. If it is too close the tractor will sneak, and if it is too far the result will never be a straight line, you have to find the optimal point so that neither of the two things happens.
-
Look Ahead Speed Gain: How far the look ahead goes ahead based on speed. If it is 1, this value will not affect, if it is greater than 1, it will increase the distance set in Look Ahead at a faster speed, and if it is less than 1, it will decrease it.
-
Sidehill Degrees per Degrees of Roll: Sidehill compensation in degrees for each degree in roll. If your field is flat let this value on zero.
-
Integral: Uses 2nd order derivatives (non-linear steering methods) to bring the vehicle back to the line. As in, as they approach the line it needs to start steering away from the line to prevent crossing back and forth over the line and never getting on course, like an icy road. the opposite is taking way too long to get back on the line. Better results are between 10-15, if you have problems to follow straight line set it to zero.
You can see a Brian explanations on Youtube video:
